Introduction 00:00
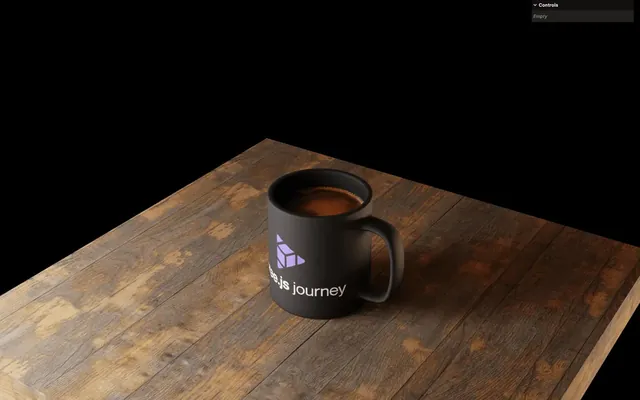
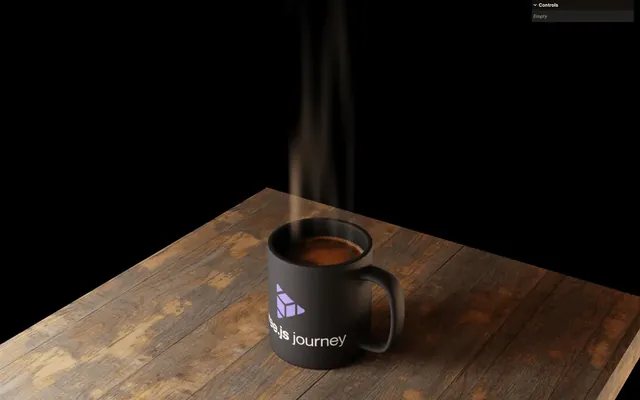
In this lesson, we are going to learn how to create an animated smoke coming out from a coffee mug.

The table and the mug have already been modeled and baked in Blender, which we are not going to cover in this lesson focused on shaders. I used a similar technique for the Portal chapter which you’ll see a bit later in the course. Still, if you are curious, you can find the model in the Resources associated with the lesson.
This smoke is inspired by My Room in 3D, a personal project I did while streaming. It’s a great exercise to practice both vertex and fragment shaders.
Perlin noise functions are bad 01:39
In the previous lessons we have been using Perlin functions to create various effects like the Raging Sea or the Shader Patterns, but using Perlin functions is actually bad for performance and can result in a frame rate drop, especially for devices with weaker GPUs.
While using Perlin function is convenient, we are going to use a much more performant approach in this lesson and use a simple Perlin image instead.

This technique is actually what most video games do in order to maintain solid performance and it’s even more important for the web since we are only allotted a portion of the computing power video games have access to.
Where to find noise textures
The Perlin noise image we are going to use in this exercise is available in the static/ folder as perlin.png, but there are many ways to retrieve or create these kinds of images.
You can download them from various online tools and resources:
You can use softwares like Figma and its Noise Texture plugin, Photoshop and its filters. In fact, we can even use Blender by rendering the noise on a plane in front of the camera.
Finally, you can use the Perlin function in WebGL but only once at the beginning and save it in a texture using a WebGLRenderTarget. While this approach is interesting and enables tweaking the Perlin easily, it’s farfetched for this lesson.
While choosing a noise texture, keep in mind the following 3 rules:
- Enough variations so that we don’t see the pattern repeating too much.
- Big enough so that it’s precise enough. Yet, you don’t need a huge resolution since the pixels are going to be interpolated.
- A repeating pattern (or “tilling”) so that we can put the image side by side with itself and not see the separation.
The Perlin image provided with the project is a good example with a 128x128 resolution and it’s repeating properly as shown in this picture composed of 4 times the same Perlin noise.

Also note that we are only going to use the red channel of the picture. A nice trick would be to save different noises in the 4 different channels in order to get multiple noises while loading only one image. Yet, for the sake of learning and simplification, we are going to use a simple grayscale picture.
Setup 10:28
The starter already contains the following:
- Base baked model with the table and the mug
- An instance of
lil-guithat we are not going to use, but it’s here so that you can tweak the smoke easily - An instance of
TextureLoader - An instance of
Clockfrom which we get theelapsedTimein thetick - The
vite-plugin-glsldependency to handle GLSL files OrbitControlsto rotate around
Base mesh 11:39
We are going to add everything related to the smoke right before the tick function.
/**
 * Smoke
 */
Geometry
For the geometry, we are going to start with a square PlaneGeometry with enough subdivision:
// Geometry
const smokeGeometry = new THREE.PlaneGeometry(1, 1, 16, 64)
Then we are going to translate it on the y using translate() so that its bottom base is at 0, 0, 0:
const smokeGeometry = new THREE.PlaneGeometry(1, 1, 16, 64)
smokeGeometry.translate(0, 0.5, 0)
And finally, scale it with scale():
const smokeGeometry = new THREE.PlaneGeometry(1, 1, 16, 64)
smokeGeometry.translate(0, 0.5, 0)
smokeGeometry.scale(1.5, 6, 1.5)
You might be wondering why we are transforming the geometry itself and not the mesh. We could have transformed the mesh, but applying it to the geometry will make the upcoming vertex calculations more convenient.
Right now, we configure the right values from the start, but in a normal project, you would have tweaked those parameters after seeing something on screen.
Material
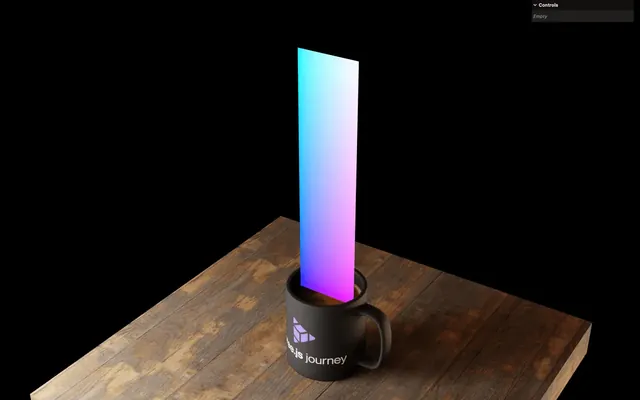
Later we are going to use a ShaderMaterial, but for now, we just want to see something on screen, which is why we are going to use a MeshBasicMaterial with color set to 'cyan' and wireframe to true:
// Material
const smokeMaterial = new THREE.MeshBasicMaterial({
    color: 'cyan',
    wireframe: true
})
Mesh
And finally, we can create the smoke Mesh using the smokeGeometry and the smokeMaterial:
// Mesh
const smoke = new THREE.Mesh(smokeGeometry, smokeMaterial)
scene.add(smoke)
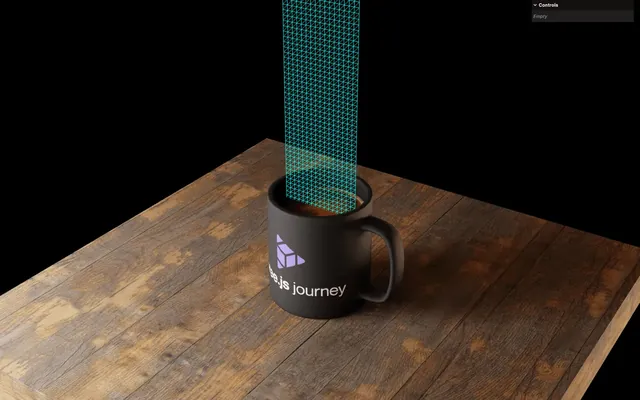
The Mesh is currently inside the mug. We can move it up by exactly 1.83 to match the model:
smoke.position.y = 1.83

As you can see, the geometry is sufficiently high, the subdivision is square-ish and we should have enough vertices to deform the plane without noticing the polygons.
Now it’s time to add the shader.
Shader 17:25
Let’s start by replacing the MeshBasicMaterial with a ShaderMaterial:
const smokeMaterial = new THREE.ShaderMaterial({
    color: 'cyan',
    wireframe: true
})
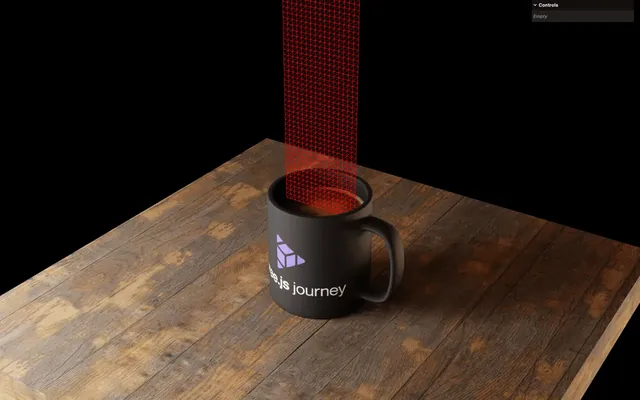
Surprisingly, the mesh is still visible but now in red.
It’s because Three.js provides default vertex and fragment shaders that look just like this. The wireframe property is still supported by ShaderMaterial, but not color. Let’s remove it:
const smokeMaterial = new THREE.ShaderMaterial({
    wireframe: true
})
This is great, but we need to send our own shader programs and we are going to create those in separate .glsl files.
Create the shader files
In src/, create a shaders/ folder and in that src/shaders/ folder, create a coffeeSmoke/ folder.
In the src/shaders/coffeeSmoke/ folder, create a vertex.glsl file and configure the minimum program we need to position the vertices:
void main()
{
// Final position
gl_Position = projectionMatrix * modelViewMatrix * vec4(position, 1.0);
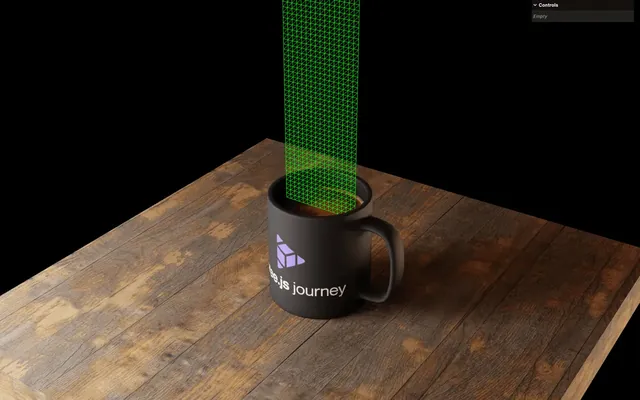
}Always in the src/shaders/coffeeSmoke/ folder, create a fragment.glsl file and configure the minimum program we need to color the fragments in green:
void main()
{
    // Final color
    gl_FragColor = vec4(0.0, 1.0, 0.0, 1.0);
}
To that fragment shader, we are going to add two #include at the very end of the main() function:
void main()
{
    // Final color
    gl_FragColor = vec4(0.0, 1.0, 0.0, 1.0);
    #include <tonemapping_fragment>
    #include <colorspace_fragment>
}
Three will inject corresponding chunks.
The tonemapping_fragment chunk will add support to the toneMapping. We are not going to set a toneMapping, but it’s good practice to anticipate it.
The colorspace_fragment chunk will convert the colors in order to comply with the renderer color space setting.
You don’t need to know much about those and only need to add them at the very end of your fragment in order to have the right colors on screen.
Use the shader files
Back in src/script.js, import both shaders as coffeeSmokeVertexShader and coffeeSmokeFragmentShader:
import coffeeSmokeVertexShader from './shaders/coffeeSmoke/vertex.glsl'
import coffeeSmokeFragmentShader from './shaders/coffeeSmoke/fragment.glsl'
Having folder and long variable names like this is debatable, but it would come in handy if we start adding more shaders to the project.
Finally, we can send those shaders to the ShaderMaterial using the vertexShader and fragmentShader properties:
const smokeMaterial = new THREE.ShaderMaterial({
    vertexShader: coffeeSmokeVertexShader,
    fragmentShader: coffeeSmokeFragmentShader,
    wireframe: true
})
Since we are going to start with the smoke pattern, let’s comment the wireframe or set it to false:
const smokeMaterial = new THREE.ShaderMaterial({
    vertexShader: coffeeSmokeVertexShader,
    fragmentShader: coffeeSmokeFragmentShader,
    // wireframe: true
})
The back of the plane isn’t visible by default.
Send THREE.DoubleSide to the side property to fix that:
const smokeMaterial = new THREE.ShaderMaterial({
    vertexShader: coffeeSmokeVertexShader,
    fragmentShader: coffeeSmokeFragmentShader,
    side: THREE.DoubleSide,
    // wireframe: true
})
Fragment shader 26:31
We are going to start with the fragment shader and create an animated smoke pattern using the Perlin texture.
Load the Perlin texture
Right before the material, load the texture located in static/perlin.png using the TextureLoader instance. Remember that we should not write static/ in the path:
// Perlin texture
const perlinTexture = textureLoader.load('./perlin.png')
Send the perlinTexture to the uniforms of the material as uPerlinTexture:
const smokeMaterial = new THREE.ShaderMaterial({
    vertexShader: coffeeSmokeVertexShader,
    fragmentShader: coffeeSmokeFragmentShader,
    uniforms:
    {
        uPerlinTexture: { value: perlinTexture }
    },
    side: THREE.DoubleSide,
    // wireframe: true
})
Until now, we have been sending uniforms as objects with a value property. While this works fine, Three.js has simplified this process using the Uniform class:
const smokeMaterial = new THREE.ShaderMaterial({
    vertexShader: coffeeSmokeVertexShader,
    fragmentShader: coffeeSmokeFragmentShader,
    uniforms:
    {
        uPerlinTexture: new THREE.Uniform(perlinTexture)
    },
    side: THREE.DoubleSide,
    // wireframe: true
})
We are going to use this solution from now on.
Retrieve the UV
Since we are going to display that texture in the fragment shader, we need the 2D coordinates on that plane and, as we know, those coordinates are called UV.
The uv is an attribute already available in the vertex and we need to send it to the fragment. We can do that using a varying.
In vertex.glsl, add a vUv varying and assign the uv to it:
varying vec2 vUv;

void main()
{
    // ...

    // Varyings
    vUv = uv;
}
In fragment.glsl, retrieve the vUv varying and send it to the gl_FragColor as the first two values while using 1.0 for the blue and alpha channels:
varying vec2 vUv;

void main()
{
    // Final color
    gl_FragColor = vec4(vUv, 1.0, 1.0);
    // ...
}
Note that assigning a vec2 into a vector with more dimensions (vec3 or vec4) will take 2 of the properties. In this case, writing vec4(vUv, 1.0, 1.0) is like writing vec4(vUv.x, vUv.y, 1.0, 1.0).
We now have texture coordinates that go from 0, 0 in the bottom left corner to 1, 1 in the top right corner.
Retrieve the texture
Always in fragment.glsl, retrieve the uPerlinTexture uniform as a sampler2D:
uniform sampler2D uPerlinTexture;Now pick the color using the texture() function at the vUv coordinates and save the result as a vec4 smoke variable:
uniform sampler2D uPerlinTexture;

varying vec2 vUv;

void main()
{
    // Smoke
    vec4 smoke = texture(uPerlinTexture, vUv);

    // ...
}
As mentioned earlier, since the Perlin texture is a grayscale image, we need only one channel and we can use the red one.
Switch the variable to a float and only retrieve the r channel:
// ...

void main()
{
    // Smoke
    float smoke = texture(uPerlinTexture, vUv).r;

    // ...
}
Test it on the first three values of the gl_FragColor:
void main()
{
    // Smoke
    float smoke = texture(uPerlinTexture, vUv).r;

    // Final color
    gl_FragColor = vec4(smoke, smoke, smoke, 1.0);
    // ...
}
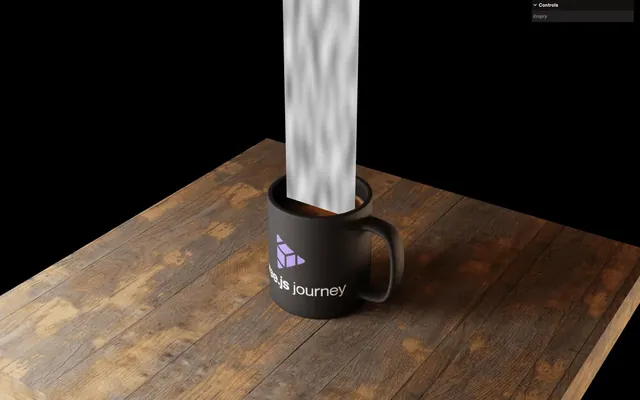
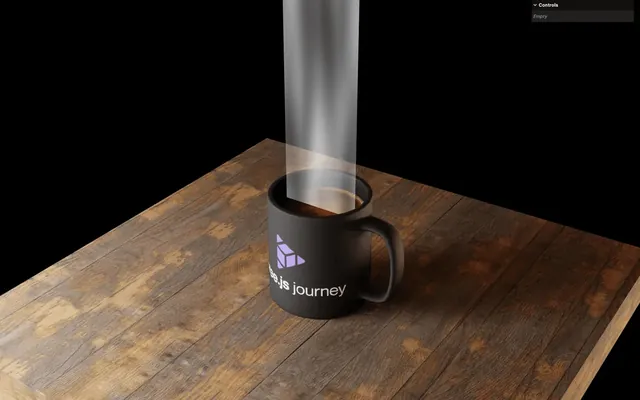
It’s starting to resemble something real.
Set the color to white with 1.0, 1.0, 1.0, and try the smoke on the alpha value (the fourth one):
void main()
{
    // ...
    gl_FragColor = vec4(1.0, 1.0, 1.0, smoke);
    // ...
}
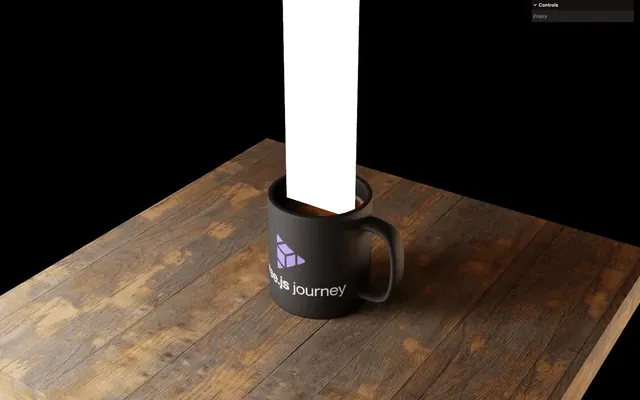
It’s all white because we forgot something.
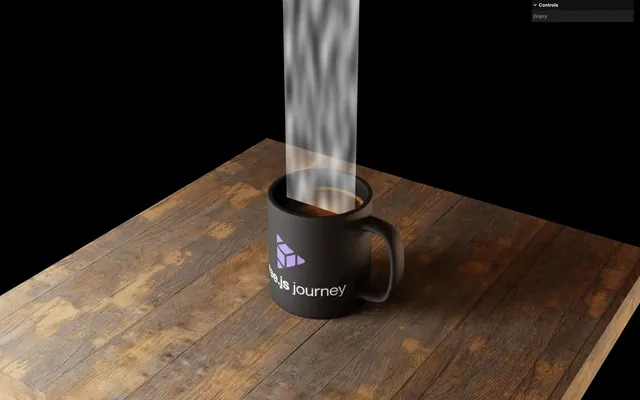
When we want to support transparency, we need to set transparent to true in the material:
const smokeMaterial = new THREE.ShaderMaterial({
    // ...
    transparent: true,
    // ...
})
Scale
We want to stretch the texture a little and animate it so that it goes up. To do that, we need to change the UV coordinates. Since we can’t modify a varying directly, we need to create a new variable out of it.
In fragment.glsl, create a vec2 smokeUv variable, assign it the vUv, and send it to the texture() instead of the vUv:
void main()
{
    // Scale and animate
    vec2 smokeUv = vUv;

    // Smoke
    float smoke = texture(uPerlinTexture, smokeUv).r;

    // ...
}
We get the same result, but we can now play with the smokeUv.
Start by multiplying the x and the y properties by small values to create a bigger pattern:
void main()
{
    // Scale and animate
    vec2 smokeUv = vUv;
    smokeUv.x *= 0.5;
    smokeUv.y *= 0.3;
}
Animate
For the animation, we want the smoke to move up along the plane, nothing fancy.
To do that, we are going to send the time as a uniform.
In script.js, add a uTime uniform to the material and assign an instance of the Uniform class set to 0:
const smokeMaterial = new THREE.ShaderMaterial({
    // ...
    uniforms:
    {
        uTime: new THREE.Uniform(0),
        uPerlinTexture: new THREE.Uniform(perlinTexture)
    },
    // ...
})
In the tick function, assign the elapsedTime to it.
Even though we are using a Uniform instance, updating it works the same and we need to update the value property:
const tick = () =>
{
    const elapsedTime = clock.getElapsedTime()

    // Update smoke
    smokeMaterial.uniforms.uTime.value = elapsedTime

    // ...
}
Back in fragment.glsl, retrieve the uTime uniform, and add it to the smokeUv.y:
uniform float uTime;
// ...

void main()
{
    // Scale and animate
    vec2 smokeUv = vUv;
    smokeUv.x *= 0.5;
    smokeUv.y *= 0.3;
    smokeUv.y += uTime;

    // ...
}
There are three issues. It’s too fast, it’s in the wrong direction, and after a second we can only see long lines.
Slow down the animation by multiplying uTime by 0.03:
void main()
{
    // ...
    smokeUv.y += uTime * 0.03;

    // ...
}
Invert it by subtracting instead of adding:
void main()
{
    // ...
    smokeUv.y -= uTime * 0.03;

    // ...
}
After a moment, we can only see long lines because the texture isn’t repeating.
To fix that, in script.js, set the wrapS and wrapT to THREE.RepeatWrapping:
const perlinTexture = textureLoader.load('./perlin.png')
perlinTexture.wrapS = THREE.RepeatWrapping
perlinTexture.wrapT = THREE.RepeatWrapping
Remap the value
It’s getting better, but the smoke is too strong. We want it to be more sporadic. To do that, we are going to remap the value.
Currently, the Perlin texture pixels go from 0 (black) to 1 (white), which is why there are no large transparent areas within the texture.
To fix that, we are going to remap the value so that it goes from 0 when it should be 0.4, to 1 when it should be 1 (this one won’t change).
This means that every value below 0.4 will be restricted to 0 and then it’ll go up to 1:
And an even better solution would be to have a smooth transition:
And this can be achieved in GLSL using the smoothstep function.
Right after creating the smoke variable, remap the value using a smoothstep. The first parameter is the bottom limit (0.4), the second parameter is the top limit (1.0) and the third parameter is the value you want to remap (smoke):
void main()
{
    // ...

    // Smoke
    float smoke = texture(uPerlinTexture, smokeUv).r;

    // Remap
    smoke = smoothstep(0.4, 1.0, smoke);

    // ...
}
smoothstep returns a 0 to 1 value, which is perfect in our case since we want to use it on the alpha. Also note that the value is clamped although it doesn’t change anything in our case.
Fade edges
We are almost done with the fragment, but the edges are too sharp.
To fix that, we are going to use the smoothstep function again in order to lower the alpha “smoothly” on the edges.
First, we are going to set the smoke to 1.0 after the remap in order to understand the upcoming instructions:
void main()
{
    // ...

    // Remap
    smoke = smoothstep(0.4, 1.0, smoke);

    // Edges
    smoke = 1.0;

    // ...
}

Let’s start with the side left edge. We want the smoke to be at 0 at the very edge and to go up very fast to 1.
To do that, we can use the smoothstep(), but this time on vUv.x:
void main()
{
    // ...

    // Edges
    smoke = 1.0;
    smoke = smoothstep(0.0, 0.1, vUv.x);

    // ...
}
Note that we use the original vUv and not the scaled and animated smokeUv.
Let’s try the same thing on the other side:
void main()
{
    // ...

    // Edges
    smoke = 1.0;
    smoke = smoothstep(0.0, 0.1, vUv.x);
    smoke = smoothstep(0.9, 1.0, vUv.x);

    // ...
}
Not exactly what we wanted. To fix that, we can just invert the first two parameters:
void main()
{
    // ...

    // Edges
    smoke = 1.0;
    smoke = smoothstep(0.0, 0.1, vUv.x);
    smoke = smoothstep(1.0, 0.9, vUv.x);

    // ...
}

And now, to combine them, we can multiply them:
void main()
{
    // ...

    // Edges
    smoke = 1.0;
    smoke *= smoothstep(0.0, 0.1, vUv.x);
    smoke *= smoothstep(1.0, 0.9, vUv.x);

    // ...
}

Let’s do the same thing for the top and bottom parts using vUv.y:
void main()
{
    // ...

    // Edges
    smoke = 1.0;
    smoke *= smoothstep(0.0, 0.1, vUv.x);
    smoke *= smoothstep(1.0, 0.9, vUv.x);
    smoke *= smoothstep(0.0, 0.1, vUv.y);
    smoke *= smoothstep(1.0, 0.4, vUv.y);

    // ...
}
And now we can remove the smoke = 1.0 in order to test our animation with the Perlin pattern:
void main()
{
    // ...

    // Edges
    smoke *= smoothstep(0.0, 0.1, vUv.x);
    smoke *= smoothstep(1.0, 0.9, vUv.x);
    smoke *= smoothstep(0.0, 0.1, vUv.y);
    smoke *= smoothstep(1.0, 0.4, vUv.y);

    // ...
}
Color
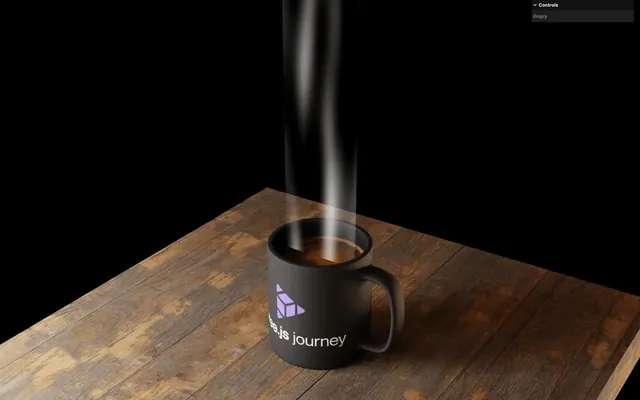
Let’s put a bright brown instead of that white color so that it merges better with the scene:
void main()
{
    // ...

    // Final color
    gl_FragColor = vec4(0.6, 0.3, 0.2, smoke);
    // ...
}
We are done with the fragment shader.
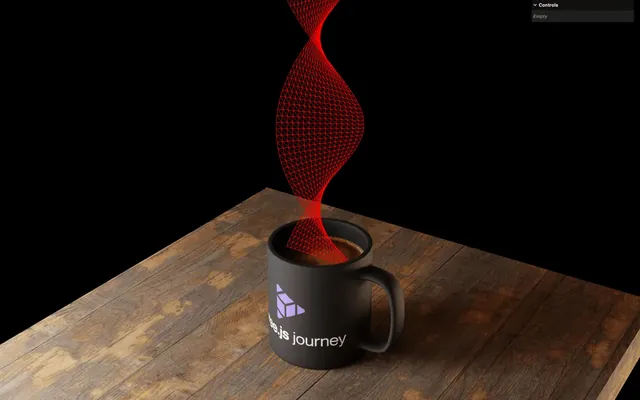
Animate the vertices 55:35
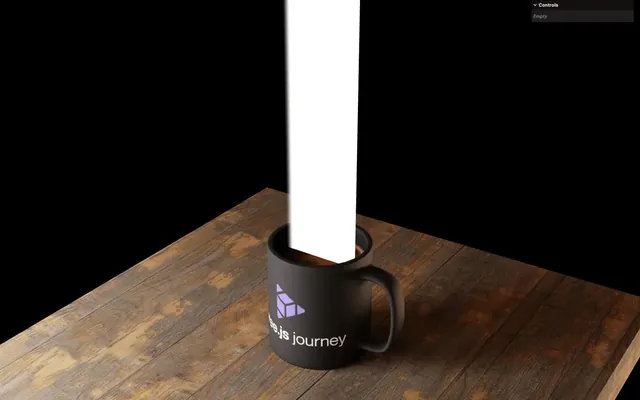
The smoke looks good, but if we move the camera, we can notice that it’s a plane and the absence of movement makes it look unrealistic.
We are going to make the smoke twist but also move with the wind.
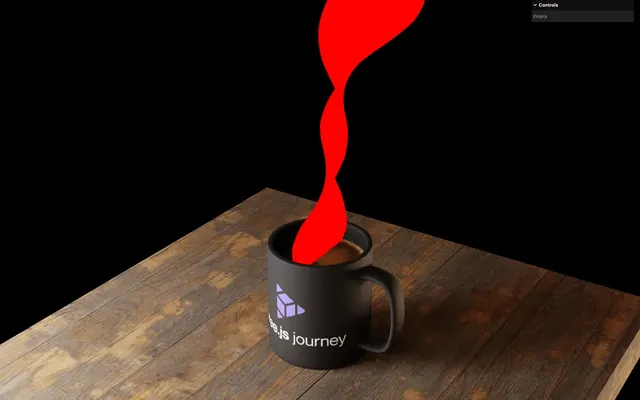
In order to appreciate the animation, we are going to set the gl_FragColor to red:
void main()
{
    // ...

    gl_FragColor = vec4(0.6, 0.3, 0.2, smoke);
    gl_FragColor = vec4(1.0, 0.0, 0.0, 1.0);
    // ...
}
and put back the wireframe on the smokeMaterial:
const smokeMaterial = new THREE.ShaderMaterial({
    // ...
    wireframe: true
})
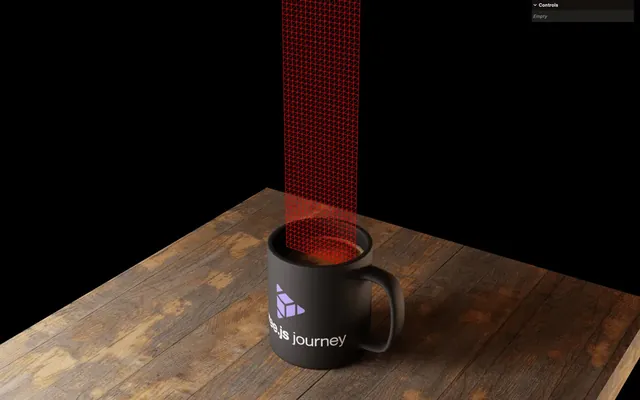
Twist
We want the vertices to rotate around the center of the plane and to have that rotation changing according to the elevation.
This means that the vertices are going to rotate on an xz plane along to the y axis:
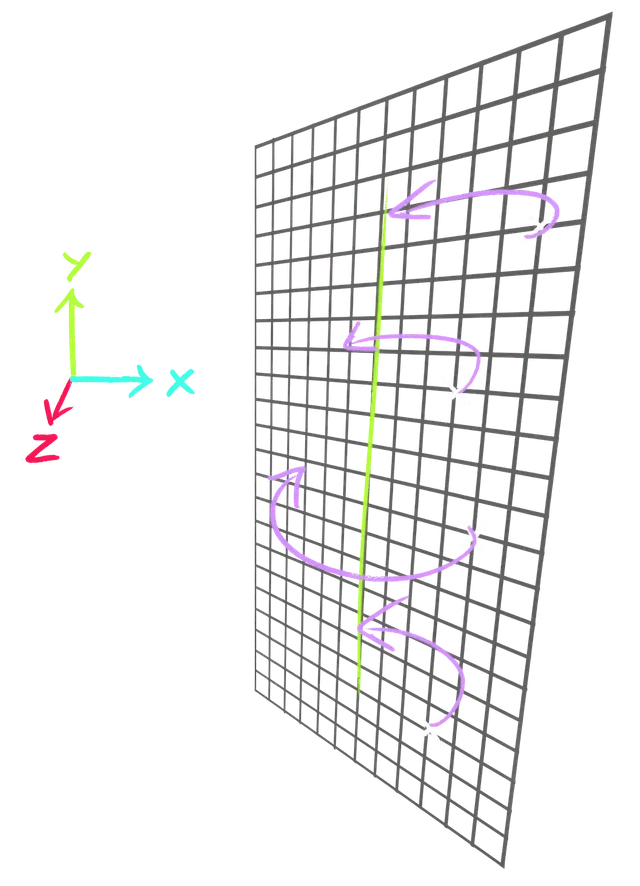
We could have calculated the rotation ourselves, but instead, let’s be lazy and use an existent function.
In vertex.glsl, add the following function before the main():
vec2 rotate2D(vec2 value, float angle)
{
    float s = sin(angle);
    float c = cos(angle);
    mat2 m = mat2(c, s, -s, c);
    return m * value;
}

void main()
{
    // ...
}
This is a typical function that we can get by quickly browsing the web or asking an AI.
We want to apply the rotation on the position before it gets transformed by the modelViewMatrix but we can’t modify the position variable directly because it’s an attribute.
To fix that, create a vec3 newPosition variable and assign the position to it, then use it on the gl_Position:
void main()
{
    vec3 newPosition = position;

    // Final position
    gl_Position = projectionMatrix * modelViewMatrix * vec4(newPosition, 1.0);

    // ...
}
We get the same result, but we can now modify newPosition.
Let’s try to rotate it using the rotate2D() function:
void main()
{
    vec3 newPosition = position;

    // Twist
    float angle = 2.0;
    newPosition.xz = rotate2D(newPosition.xz, angle);

    // ...
}

It’s working, but all vertices rotate the same way. We need the rotation to vary according to the elevation.
Send the newPosition.y as the angle:
void main()
{
    // ...

    // Twist
    float angle = newPosition.y;
    newPosition.xz = rotate2D(newPosition.xz, angle);

    // ...
}
It’s nice, but it’s too regular and not animated. Fortunately, we already have all we need and we are going to use the same uTime and uPerlinTexture that we used in the fragment shader.
Retrieve the two uniforms in the vertex shader:
uniform float uTime;
uniform sampler2D uPerlinTexture;
We now need to pick the color on the uPerlinTexture using texture().
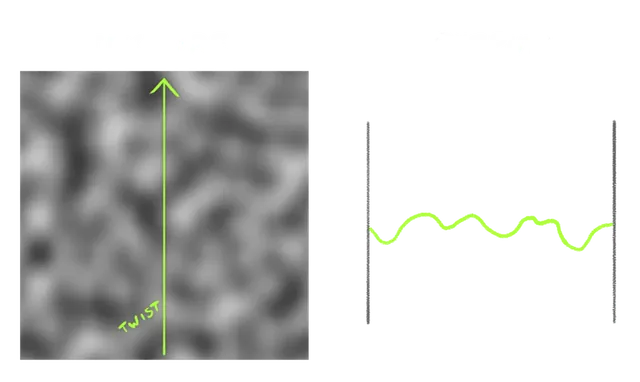
We want a value that will change according to the elevation only. For this reason, as the first value of the vec2() we are sending to texture(), we are going to put 0.5 and use uv.y as the second value.
Save the result in twistPerlin:
void main()
{
    // ...

    // Twist
    float twistPerlin = texture(uPerlinTexture, vec2(0.5, uv.y)).r;
    float angle = newPosition.y;
    newPosition.xz = rotate2D(newPosition.xz, angle);

    // ...
}
It’s like picking a value on a line going through the Perlin texture:
Assign twistPerlin to the angle:
void main()
{
    // ...

    // Twist
    float twistPerlin = texture(uPerlinTexture, vec2(0.5, uv.y)).r;
    float angle = twistPerlin;
    newPosition.xz = rotate2D(newPosition.xz, angle);

    // ...
}
Multiply the angle by 10.0 to make the twist stronger:
void main()
{
    // ...

    // Twist
    float twistPerlin = texture(uPerlinTexture, vec2(0.5, uv.y)).r;
    float angle = twistPerlin * 10.0;
    newPosition.xz = rotate2D(newPosition.xz, angle);

    // ...
}

Multiply uv.y by 0.2 to reduce the frequency:
void main()
{
    // ...

    // Twist
    float twistPerlin = texture(uPerlinTexture, vec2(0.5, uv.y * 0.2)).r;

    // ...
}

Add line breaks if you want to achieve better readability:
void main()
{
    // ...

    // Twist
    float twistPerlin = texture(
        uPerlinTexture,
        vec2(0.5, uv.y * 0.2)
    ).r;

    // ...
}
We can now subtract uTime to animate the pattern:
void main()
{
// ...
// Twist
float twistPerlin = texture(
uPerlinTexture,
vec2(0.5, uv.y * 0.2 - uTime * 0.005)
).r;
// ...
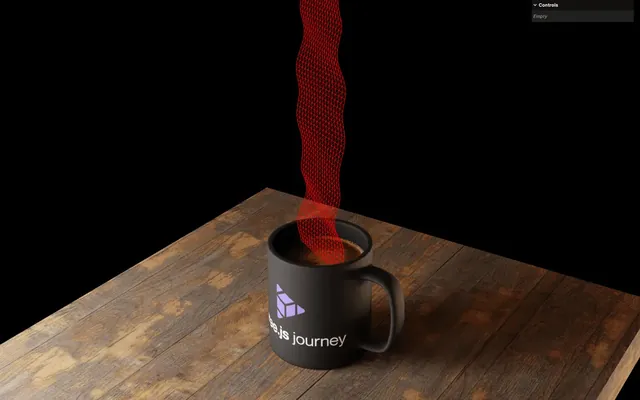
}Wind
Before testing with the actual smoke pattern, we are going to simulate wind.
To calculate the strength of the wind, we are going to use the same technique as for the twist by picking a color from the Perlin texture and move the vertices on the x and z axes.
After the Twist part, create a vec2 windOffset set to 0 and 0 to start with and add it to the newPosition.xz (we only want it to move laterally):
void main()
{
// ...
// Twist
// ...
// Wind
vec2 windOffset = vec2(
0,
0
);
newPosition.xz += windOffset;
// ...
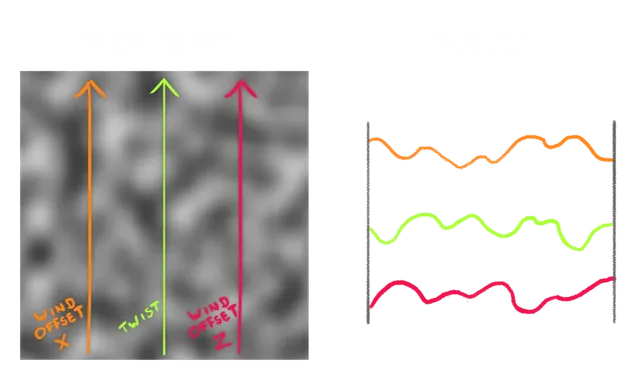
}We are going to focus on the x for now which corresponds to the first value of the windOffset and we are going to use the same technique as before by picking a color for the Perlin texture.
For the coordinates we send to texture(), we are going to use 0.25 and uTime:
void main()
{
    // ...

    // Wind
    vec2 windOffset = vec2(
        texture(uPerlinTexture, vec2(0.25, uTime)).r,
        0
    );
    newPosition.xz += windOffset;

    // ...
}
We’ve selected 0.25 to avoid picking the same line that we used for the twist (which was set at 0.5). Additionally, we are using uTime so that it changes in time, resembling a line going up on the Perlin texture:

The animation is obviously too fast, but we are going to keep that speed for the moment and focus on the shape and direction.
First, let’s increase the strength by multiplying windOffset by 10.0:
void main()
{
    // ...

    // Wind
    vec2 windOffset = vec2(
        texture(uPerlinTexture, vec2(0.25, uTime)).r,
        0
    );
    windOffset *= 10.0;
    newPosition.xz += windOffset;

    // ...
}
In order to have the bottom of the smoke sticking to the initial position, we can multiply by uv.y because uv.y is equal to 0 at the bottom and then goes up:
void main()
{
    // ...

    // Wind
    vec2 windOffset = vec2(
        texture(uPerlinTexture, vec2(0.25, uTime)).r,
        0
    );
    windOffset *= uv.y  * 10.0;
    newPosition.xz += windOffset;

    // ...
}
Better, but not realistic. We want the strength to be very low at the bottom, to increase slowly at first, and then to increase fast when reaching the top of the smoke, which we can get using a power:
Apply a power of 2 on the uv.y using the pow function:
void main()
{
    // ...

    // Wind
    vec2 windOffset = vec2(
        texture(uPerlinTexture, vec2(0.25, uTime)).r,
        0
    );
    windOffset *= pow(uv.y, 2.0) * 10.0;
    newPosition.xz += windOffset;

    // ...
}
We also need the value to be as much positive as negative. Because windOffset.x is extracted from the Perlin texture, it goes from 0 to 1 . Subtracting 0.5 results in values ranging from -0.5 to +0.5:
void main()
{
    // ...

    // Wind
    vec2 windOffset = vec2(
        texture(uPerlinTexture, vec2(0.25, uTime)).r - 0.5,
        0
    );
    windOffset *= pow(uv.y, 2.0) * 10.0;
    newPosition.xz += windOffset;

    // ...
}
Now it’s time to slow down the animation by multiplying the uTime by 0.01:
void main()
{
    // ...

    // Wind
    vec2 windOffset = vec2(
        texture(uPerlinTexture, vec2(0.25, uTime * 0.01)).r - 0.5,
        0
    );
    windOffset *= pow(uv.y, 2.0) * 10.0;
    newPosition.xz += windOffset;

    // ...
}
Let’s do the same on the z axis by replacing the second value of windOffeset with the same formula:
void main()
{
    // ...

    // Wind
    vec2 windOffset = vec2(
        texture(uPerlinTexture, vec2(0.25, uTime * 0.01)).r - 0.5,
        texture(uPerlinTexture, vec2(0.25, uTime * 0.01)).r - 0.5
    );

    // ...
}
You might notice that the animation is the same on the x and the z, which results in a diagonal translation only.
It’s because we are picking the exact same values for the Perlin texture.
We can fix that by changing 0.25 to 0.75 so that we pick values on a different line of the texture:
void main()
{
    // ...

    // Wind
    vec2 windOffset = vec2(
        texture(uPerlinTexture, vec2(0.25, uTime * 0.01)).r - 0.5,
        texture(uPerlinTexture, vec2(0.75, uTime * 0.01)).r - 0.5
    );

    // ...
}
Remove or comment the wireframe:
const smokeMaterial = new THREE.ShaderMaterial({
    // wireframe: true
})
Put back the initial gl_FragColor in the fragment shader:
void main()
{
// ...
// Final color
gl_FragColor = vec4(0.6, 0.3, 0.2, smoke);
#include <tonemapping_fragment>
#include <colorspace_fragment>
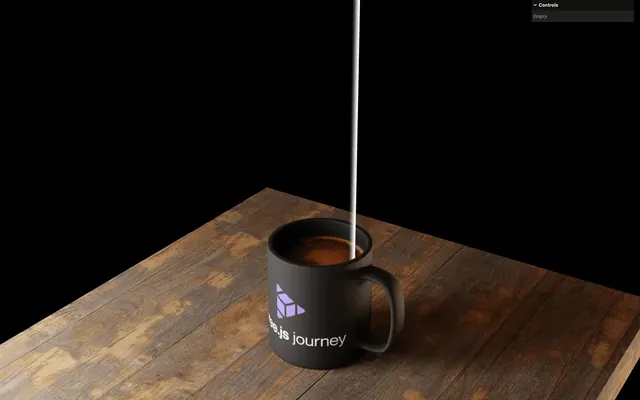
}Transparency occluding 01:20:33
That’s good-looking and well-animated smoke. However, observed from some angles, it seems that the plane is occluding itself:
It’s because the plane is writing on the depth buffer, meaning that it’ll occlude anything behind it, including itself.
To fix that, we can ask the material not to draw in the depth buffer by setting depthWrite to false on smokeMaterial:
const smokeMaterial = new THREE.ShaderMaterial({
    // ...
    depthWrite: false,
    // ...
})
Separating shader chunks 01:21:39
We are done, but let’s do some cleaning.
Until now, we’ve put the functions we needed directly in the programs before the main() function, as we did for rotate2D or the Perlin functions in previous lessons.
It works fine, but it can get messy and you might end up with the same functions in multiple files.
We are going to move the rotate2D function to a separate file and include it.
In src/shaders/, create a includes/ folder.
In that src/shaders/includes/ folder, create a rotate2D.glsl file and add the rotate2D function in it:
vec2 rotate2D(vec2 value, float angle)
{
    float s = sin(angle);
    float c = cos(angle);
    mat2 m = mat2(c, s, -s, c);
    return m * value;
}
Back in vertex.glsl, instead of the function, use the following syntax to include the file:
// ...

#include ../includes/rotate2D.glsl

void main()
{
    // ...
}
Make sure everything is saved and the project should work like before.
While it is not mandatory, it’s considered good practice and it makes the function easily reusable in other shaders.
Going further 01:23:43
We’ve created a beautiful and realistic coffee smoke using a simple Perlin texture, which improves performance tremendously compared to a Perlin function.
Although it lacks the flexibility of the Perlin function and it’s limited to 2D space since it’s a texture, in most situations it’s enough and totally worth it.
Since we are focusing on shaders, we are going to stop here, but feel free to improve the experience. Here are a few ideas:
- Add tweaks to the fragment pattern
- Add tweaks to the vertex animation
- Add a tweak to the color
- Use your own model for the scenery
- Add floating marshmallows
- Make the wind move with the cursor